【工具】2025年AI Coding部分产品技术分析——ClaudeCode和CodexCLI
Nov 2, 2025工具ai2025年AI Coding部分产品技术分析——ClaudeCode和CodexCLI
能力情况:
| Coding Agent | Code Search | File Ops | Shell | Web Search | Testing | MCP | Multimodal | Context |
|---|---|---|---|---|---|---|---|---|
| Claude Code | ✓ | ✓ | ✓ | ✓ | ✓ | ✓ | ✓ | |
| Codex | ✓ | ✓ | ✓ | ✓ | ✓ | ✓ | ✓ |
Claude Code
https://claude.com/product/claude-code,逆向项目(v1.0.33版本):https://github.com/shareAI-lab/analysis_claude_code
技术创新
1. 实时 Steering 机制
- 基础架构: h2A 双重缓冲异步消息队列
- 核心特性: 零延迟消息传递,吞吐量 > 10,000 消息/秒
- 实现原理: Promise-based 异步迭代器 + 智能背压控制
- 技术优势: 真正的非阻塞异步处理,支持实时流式响应
2. 分层多 Agent 架构
- 主Agent: nO 主循环引擎,负责核心任务调度
- SubAgent: I2A 子任务代理,提供隔离执行环境
- Task Agent: 专用任务处理器,支持并发执行
- 权限隔离: 每个Agent都有独立的权限范围和资源访问控制
3. 智能上下文管理
- 压缩算法: 92% 阈值自动触发上下文压缩
- 内存优化: wU2 压缩器,智能保留关键信息
- 持久化: CLAUDE.md 文件作为长期记忆存储
- 动态管理: 根据Token使用情况动态调整上下文大小
4. 强化安全防护
- 6层权限验证: 从UI到工具执行的完整安全链
- 沙箱隔离: 工具执行环境完全隔离
- 输入验证: 多层次的恶意输入检测和过滤
- 权限网关: 细粒度的功能权限控制
1 | Claude Code Agent 系统架构 |
记忆与上下文管理机制
三层记忆架构
1 | 记忆与上下文管理系统架构 |
上下文注入与恢复机制
1 | 文件内容注入与恢复流程 |
工具执行引擎架构
1 | 工具执行引擎 (MH1) 完整流水线 |
SubAgent架构与Task工具
1 | SubAgent架构与Task工具机制 |
长期规划机制——Todo系统技术实现
1 | Todo系统完整架构图 |
System-Reminder动态注入机制
1 | System-Reminder动态注入与上下文管理流程 |
6层安全防护架构
1 | Claude Code 6层安全防护体系 |
关键Prompt
System prompt
1 | You are an interactive CLI tool that helps users with software engineering tasks. Use the instructions below and the tools available to you to assist the user. |
Tools Prompt1
2
3
4
5
6
7
8
9
10
11
12
13
14
15
16
17
18
19
20
21
22
23
24
25
26
27
28
29
30
31
32
33
34
35
36
37
38
39
40
41
42
43
44
45
46
47
48
49
50
51
52
53
54
55
56
57
58
59
60
61
62
63
64
65
66
67
68
69
70
71
72
73
74
75
76
77
78
79
80
81
82
83
84
85
86
87
88
89
90
91
92
93
94
95
96
97
98
99
100
101
102
103
104
105
106
107
108
109
110
111
112
113
114
115
116
117
118
119
120
121
122
123
124
125
126
127
128
129
130
131
132
133
134
135
136
137
138
139
140
141
142
143
144
145
146
147
148
149
150
151
152
153
154
155
156
157
158
159
160
161
162
163
164
165
166
167
168
169
170
171
172
173
174
175
176
177
178
179
180
181
182
183
184
185
186
187
188
189
190
191
192
193
194
195
196
197
198
199
200
201
202
203
204
205
206
207
208
209
210
211
212
213
214
215
216
217
218
219
220
221
222
223
224
225
226
227
228
229
230
231
232
233
234
235
236
237
238
239
240
241
242
243
244
245
246
247
248
249
250
251
252
253
254
255
256
257
258
259
260
261
262
263
264
265
266
267
268
269
270
271
272
273
274
275
276
277
278
279
280
281
282
283
284
285
286
287
288
289
290
291
292
293
294
295
296
297
298
299
300
301
302
303
304
305
306
307
308
309
310
311
312
313
314
315
316
317
318
319
320
321
322
323
324
325
326
327
328
329
330
331
332
333
334
335
336
337
338
339
340
341
342
343
344
345
346
347
348
349
350
351
352
353
354
355
356
357
358
359
360
361
362
363
364
365
366
367
368
369
370
371
372
373
374
375
376
377
378
379
380
381
382
383
384
385
386
387
388
389
390
391
392
393
394
395
396
397
398
399
400
401
402
403
404
405
406
407
408
409
410
411
412
413
414
415
416
417
418
419
420
421
422
423
424
425
426
427
428
429
430
431
432
433
434
435
436
437
438
439
440
441
442
443
444
445
446
447
448
449
450
451
452
453
454
455
456
457
458
459
460
461
462
463
464
465
466
467
468
469
470
471
472
473
474
475
476
477
478
479
480
481
482
483
484
485
486
487
488
489
490
491
492
493
494
495
496
497
498
499
500
501
502
503
504
505
506
507
508{
"tools": [
{
"name": "Task",
"description": "Launch a new agent to handle complex, multi-step tasks autonomously. \n\nAvailable agent types and the tools they have access to:\n- general-purpose: General-purpose agent for researching complex questions, searching for code, and executing multi-step tasks. When you are searching for a keyword or file and are not confident that you will find the right match in the first few tries use this agent to perform the search for you. (Tools: *)\n- statusline-setup: Use this agent to configure the user's Claude Code status line setting. (Tools: Read, Edit)\n- output-style-setup: Use this agent to create a Claude Code output style. (Tools: Read, Write, Edit, Glob, LS, Grep)\n\nWhen using the Task tool, you must specify a subagent_type parameter to select which agent type to use.\n\n\n\nWhen NOT to use the Agent tool:\n- If you want to read a specific file path, use the Read or Glob tool instead of the Agent tool, to find the match more quickly\n- If you are searching for a specific class definition like \"class Foo\", use the Glob tool instead, to find the match more quickly\n- If you are searching for code within a specific file or set of 2-3 files, use the Read tool instead of the Agent tool, to find the match more quickly\n- Other tasks that are not related to the agent descriptions above\n\n\nUsage notes:\n1. Launch multiple agents concurrently whenever possible, to maximize performance; to do that, use a single message with multiple tool uses\n2. When the agent is done, it will return a single message back to you. The result returned by the agent is not visible to the user. To show the user the result, you should send a text message back to the user with a concise summary of the result.\n3. Each agent invocation is stateless. You will not be able to send additional messages to the agent, nor will the agent be able to communicate with you outside of its final report. Therefore, your prompt should contain a highly detailed task description for the agent to perform autonomously and you should specify exactly what information the agent should return back to you in its final and only message to you.\n4. The agent's outputs should generally be trusted\n5. Clearly tell the agent whether you expect it to write code or just to do research (search, file reads, web fetches, etc.), since it is not aware of the user's intent\n6. If the agent description mentions that it should be used proactively, then you should try your best to use it without the user having to ask for it first. Use your judgement.\n\nExample usage:\n\n<example_agent_descriptions>\n\"code-reviewer\": use this agent after you are done writing a signficant piece of code\n\"greeting-responder\": use this agent when to respond to user greetings with a friendly joke\n</example_agent_description>\n\n<example>\nuser: \"Please write a function that checks if a number is prime\"\nassistant: Sure let me write a function that checks if a number is prime\nassistant: First let me use the Write tool to write a function that checks if a number is prime\nassistant: I'm going to use the Write tool to write the following code:\n<code>\nfunction isPrime(n) {\n if (n <= 1) return false\n for (let i = 2; i * i <= n; i++) {\n if (n % i === 0) return false\n }\n return true\n}\n</code>\n<commentary>\nSince a signficant piece of code was written and the task was completed, now use the code-reviewer agent to review the code\n</commentary>\nassistant: Now let me use the code-reviewer agent to review the code\nassistant: Uses the Task tool to launch the with the code-reviewer agent \n</example>\n\n<example>\nuser: \"Hello\"\n<commentary>\nSince the user is greeting, use the greeting-responder agent to respond with a friendly joke\n</commentary>\nassistant: \"I'm going to use the Task tool to launch the with the greeting-responder agent\"\n</example>\n",
"input_schema": {
"type": "object",
"properties": {
"description": {
"type": "string",
"description": "A short (3-5 word) description of the task"
},
"prompt": {
"type": "string",
"description": "The task for the agent to perform"
},
"subagent_type": {
"type": "string",
"description": "The type of specialized agent to use for this task"
}
},
"required": [
"description",
"prompt",
"subagent_type"
],
"additionalProperties": false,
"$schema": "http://json-schema.org/draft-07/schema#"
}
},
{
"name": "Bash",
"description": "Executes a given bash command in a persistent shell session with optional timeout, ensuring proper handling and security measures.\n\nBefore executing the command, please follow these steps:\n\n1. Directory Verification:\n - If the command will create new directories or files, first use the LS tool to verify the parent directory exists and is the correct location\n - For example, before running \"mkdir foo/bar\", first use LS to check that \"foo\" exists and is the intended parent directory\n\n2. Command Execution:\n - Always quote file paths that contain spaces with double quotes (e.g., cd \"path with spaces/file.txt\")\n - Examples of proper quoting:\n - cd \"/Users/name/My Documents\" (correct)\n - cd /Users/name/My Documents (incorrect - will fail)\n - python \"/path/with spaces/script.py\" (correct)\n - python /path/with spaces/script.py (incorrect - will fail)\n - After ensuring proper quoting, execute the command.\n - Capture the output of the command.\n\nUsage notes:\n - The command argument is required.\n - You can specify an optional timeout in milliseconds (up to 600000ms / 10 minutes). If not specified, commands will timeout after 120000ms (2 minutes).\n - It is very helpful if you write a clear, concise description of what this command does in 5-10 words.\n - If the output exceeds 30000 characters, output will be truncated before being returned to you.\n - You can use the `run_in_background` parameter to run the command in the background, which allows you to continue working while the command runs. You can monitor the output using the Bash tool as it becomes available. Never use `run_in_background` to run 'sleep' as it will return immediately. You do not need to use '&' at the end of the command when using this parameter.\n - VERY IMPORTANT: You MUST avoid using search commands like `find` and `grep`. Instead use Grep, Glob, or Task to search. You MUST avoid read tools like `cat`, `head`, `tail`, and `ls`, and use Read and LS to read files.\n - If you _still_ need to run `grep`, STOP. ALWAYS USE ripgrep at `rg` first, which all Claude Code users have pre-installed.\n - When issuing multiple commands, use the ';' or '&&' operator to separate them. DO NOT use newlines (newlines are ok in quoted strings).\n - Try to maintain your current working directory throughout the session by using absolute paths and avoiding usage of `cd`. You may use `cd` if the User explicitly requests it.\n <good-example>\n pytest /foo/bar/tests\n </good-example>\n <bad-example>\n cd /foo/bar && pytest tests\n </bad-example>\n\n\n# Committing changes with git\n\nWhen the user asks you to create a new git commit, follow these steps carefully:\n\n1. You have the capability to call multiple tools in a single response. When multiple independent pieces of information are requested, batch your tool calls together for optimal performance. ALWAYS run the following bash commands in parallel, each using the Bash tool:\n - Run a git status command to see all untracked files.\n - Run a git diff command to see both staged and unstaged changes that will be committed.\n - Run a git log command to see recent commit messages, so that you can follow this repository's commit message style.\n2. Analyze all staged changes (both previously staged and newly added) and draft a commit message:\n - Summarize the nature of the changes (eg. new feature, enhancement to an existing feature, bug fix, refactoring, test, docs, etc.). Ensure the message accurately reflects the changes and their purpose (i.e. \"add\" means a wholly new feature, \"update\" means an enhancement to an existing feature, \"fix\" means a bug fix, etc.).\n - Check for any sensitive information that shouldn't be committed\n - Draft a concise (1-2 sentences) commit message that focuses on the \"why\" rather than the \"what\"\n - Ensure it accurately reflects the changes and their purpose\n3. You have the capability to call multiple tools in a single response. When multiple independent pieces of information are requested, batch your tool calls together for optimal performance. ALWAYS run the following commands in parallel:\n - Add relevant untracked files to the staging area.\n - Create the commit with a message ending with:\n 🤖 Generated with [Claude Code](https://claude.ai/code)\n\n Co-Authored-By: Claude <noreply@anthropic.com>\n - Run git status to make sure the commit succeeded.\n4. If the commit fails due to pre-commit hook changes, retry the commit ONCE to include these automated changes. If it fails again, it usually means a pre-commit hook is preventing the commit. If the commit succeeds but you notice that files were modified by the pre-commit hook, you MUST amend your commit to include them.\n\nImportant notes:\n- NEVER update the git config\n- NEVER run additional commands to read or explore code, besides git bash commands\n- NEVER use the TodoWrite or Task tools\n- DO NOT push to the remote repository unless the user explicitly asks you to do so\n- IMPORTANT: Never use git commands with the -i flag (like git rebase -i or git add -i) since they require interactive input which is not supported.\n- If there are no changes to commit (i.e., no untracked files and no modifications), do not create an empty commit\n- In order to ensure good formatting, ALWAYS pass the commit message via a HEREDOC, a la this example:\n<example>\ngit commit -m \"$(cat <<'EOF'\n Commit message here.\n\n 🤖 Generated with [Claude Code](https://claude.ai/code)\n\n Co-Authored-By: Claude <noreply@anthropic.com>\n EOF\n )\"\n</example>\n\n# Creating pull requests\nUse the gh command via the Bash tool for ALL GitHub-related tasks including working with issues, pull requests, checks, and releases. If given a Github URL use the gh command to get the information needed.\n\nIMPORTANT: When the user asks you to create a pull request, follow these steps carefully:\n\n1. You have the capability to call multiple tools in a single response. When multiple independent pieces of information are requested, batch your tool calls together for optimal performance. ALWAYS run the following bash commands in parallel using the Bash tool, in order to understand the current state of the branch since it diverged from the main branch:\n - Run a git status command to see all untracked files\n - Run a git diff command to see both staged and unstaged changes that will be committed\n - Check if the current branch tracks a remote branch and is up to date with the remote, so you know if you need to push to the remote\n - Run a git log command and `git diff [base-branch]...HEAD` to understand the full commit history for the current branch (from the time it diverged from the base branch)\n2. Analyze all changes that will be included in the pull request, making sure to look at all relevant commits (NOT just the latest commit, but ALL commits that will be included in the pull request!!!), and draft a pull request summary\n3. You have the capability to call multiple tools in a single response. When multiple independent pieces of information are requested, batch your tool calls together for optimal performance. ALWAYS run the following commands in parallel:\n - Create new branch if needed\n - Push to remote with -u flag if needed\n - Create PR using gh pr create with the format below. Use a HEREDOC to pass the body to ensure correct formatting.\n<example>\ngh pr create --title \"the pr title\" --body \"$(cat <<'EOF'\n## Summary\n<1-3 bullet points>\n\n## Test plan\n[Checklist of TODOs for testing the pull request...]\n\n🤖 Generated with [Claude Code](https://claude.ai/code)\nEOF\n)\"\n</example>\n\nImportant:\n- NEVER update the git config\n- DO NOT use the TodoWrite or Task tools\n- Return the PR URL when you're done, so the user can see it\n\n# Other common operations\n- View comments on a Github PR: gh api repos/foo/bar/pulls/123/comments",
"input_schema": {
"type": "object",
"properties": {
"command": {
"type": "string",
"description": "The command to execute"
},
"timeout": {
"type": "number",
"description": "Optional timeout in milliseconds (max 600000)"
},
"description": {
"type": "string",
"description": " Clear, concise description of what this command does in 5-10 words. Examples:\nInput: ls\nOutput: Lists files in current directory\n\nInput: git status\nOutput: Shows working tree status\n\nInput: npm install\nOutput: Installs package dependencies\n\nInput: mkdir foo\nOutput: Creates directory 'foo'"
},
"run_in_background": {
"type": "boolean",
"description": "Set to true to run this command in the background. Use BashOutput to read the output later."
}
},
"required": [
"command"
],
"additionalProperties": false,
"$schema": "http://json-schema.org/draft-07/schema#"
}
},
{
"name": "Glob",
"description": "- Fast file pattern matching tool that works with any codebase size\n- Supports glob patterns like \"**/*.js\" or \"src/**/*.ts\"\n- Returns matching file paths sorted by modification time\n- Use this tool when you need to find files by name patterns\n- When you are doing an open ended search that may require multiple rounds of globbing and grepping, use the Agent tool instead\n- You have the capability to call multiple tools in a single response. It is always better to speculatively perform multiple searches as a batch that are potentially useful.",
"input_schema": {
"type": "object",
"properties": {
"pattern": {
"type": "string",
"description": "The glob pattern to match files against"
},
"path": {
"type": "string",
"description": "The directory to search in. If not specified, the current working directory will be used. IMPORTANT: Omit this field to use the default directory. DO NOT enter \"undefined\" or \"null\" - simply omit it for the default behavior. Must be a valid directory path if provided."
}
},
"required": [
"pattern"
],
"additionalProperties": false,
"$schema": "http://json-schema.org/draft-07/schema#"
}
},
{
"name": "Grep",
"description": "A powerful search tool built on ripgrep\n\n Usage:\n - ALWAYS use Grep for search tasks. NEVER invoke `grep` or `rg` as a Bash command. The Grep tool has been optimized for correct permissions and access.\n - Supports full regex syntax (e.g., \"log.*Error\", \"function\\s+\\w+\")\n - Filter files with glob parameter (e.g., \"*.js\", \"**/*.tsx\") or type parameter (e.g., \"js\", \"py\", \"rust\")\n - Output modes: \"content\" shows matching lines, \"files_with_matches\" shows only file paths (default), \"count\" shows match counts\n - Use Task tool for open-ended searches requiring multiple rounds\n - Pattern syntax: Uses ripgrep (not grep) - literal braces need escaping (use `interface\\{\\}` to find `interface{}` in Go code)\n - Multiline matching: By default patterns match within single lines only. For cross-line patterns like `struct \\{[\\s\\S]*?field`, use `multiline: true`\n",
"input_schema": {
"type": "object",
"properties": {
"pattern": {
"type": "string",
"description": "The regular expression pattern to search for in file contents"
},
"path": {
"type": "string",
"description": "File or directory to search in (rg PATH). Defaults to current working directory."
},
"glob": {
"type": "string",
"description": "Glob pattern to filter files (e.g. \"*.js\", \"*.{ts,tsx}\") - maps to rg --glob"
},
"output_mode": {
"type": "string",
"enum": [
"content",
"files_with_matches",
"count"
],
"description": "Output mode: \"content\" shows matching lines (supports -A/-B/-C context, -n line numbers, head_limit), \"files_with_matches\" shows file paths (supports head_limit), \"count\" shows match counts (supports head_limit). Defaults to \"files_with_matches\"."
},
"-B": {
"type": "number",
"description": "Number of lines to show before each match (rg -B). Requires output_mode: \"content\", ignored otherwise."
},
"-A": {
"type": "number",
"description": "Number of lines to show after each match (rg -A). Requires output_mode: \"content\", ignored otherwise."
},
"-C": {
"type": "number",
"description": "Number of lines to show before and after each match (rg -C). Requires output_mode: \"content\", ignored otherwise."
},
"-n": {
"type": "boolean",
"description": "Show line numbers in output (rg -n). Requires output_mode: \"content\", ignored otherwise."
},
"-i": {
"type": "boolean",
"description": "Case insensitive search (rg -i)"
},
"type": {
"type": "string",
"description": "File type to search (rg --type). Common types: js, py, rust, go, java, etc. More efficient than include for standard file types."
},
"head_limit": {
"type": "number",
"description": "Limit output to first N lines/entries, equivalent to \"| head -N\". Works across all output modes: content (limits output lines), files_with_matches (limits file paths), count (limits count entries). When unspecified, shows all results from ripgrep."
},
"multiline": {
"type": "boolean",
"description": "Enable multiline mode where . matches newlines and patterns can span lines (rg -U --multiline-dotall). Default: false."
}
},
"required": [
"pattern"
],
"additionalProperties": false,
"$schema": "http://json-schema.org/draft-07/schema#"
}
},
{
"name": "LS",
"description": "Lists files and directories in a given path. The path parameter must be an absolute path, not a relative path. You can optionally provide an array of glob patterns to ignore with the ignore parameter. You should generally prefer the Glob and Grep tools, if you know which directories to search.",
"input_schema": {
"type": "object",
"properties": {
"path": {
"type": "string",
"description": "The absolute path to the directory to list (must be absolute, not relative)"
},
"ignore": {
"type": "array",
"items": {
"type": "string"
},
"description": "List of glob patterns to ignore"
}
},
"required": [
"path"
],
"additionalProperties": false,
"$schema": "http://json-schema.org/draft-07/schema#"
}
},
{
"name": "ExitPlanMode",
"description": "Use this tool when you are in plan mode and have finished presenting your plan and are ready to code. This will prompt the user to exit plan mode. \nIMPORTANT: Only use this tool when the task requires planning the implementation steps of a task that requires writing code. For research tasks where you're gathering information, searching files, reading files or in general trying to understand the codebase - do NOT use this tool.\n\nEg. \n1. Initial task: \"Search for and understand the implementation of vim mode in the codebase\" - Do not use the exit plan mode tool because you are not planning the implementation steps of a task.\n2. Initial task: \"Help me implement yank mode for vim\" - Use the exit plan mode tool after you have finished planning the implementation steps of the task.\n",
"input_schema": {
"type": "object",
"properties": {
"plan": {
"type": "string",
"description": "The plan you came up with, that you want to run by the user for approval. Supports markdown. The plan should be pretty concise."
}
},
"required": [
"plan"
],
"additionalProperties": false,
"$schema": "http://json-schema.org/draft-07/schema#"
}
},
{
"name": "Read",
"description": "Reads a file from the local filesystem. You can access any file directly by using this tool.\nAssume this tool is able to read all files on the machine. If the User provides a path to a file assume that path is valid. It is okay to read a file that does not exist; an error will be returned.\n\nUsage:\n- The file_path parameter must be an absolute path, not a relative path\n- By default, it reads up to 2000 lines starting from the beginning of the file\n- You can optionally specify a line offset and limit (especially handy for long files), but it's recommended to read the whole file by not providing these parameters\n- Any lines longer than 2000 characters will be truncated\n- Results are returned using cat -n format, with line numbers starting at 1\n- This tool allows Claude Code to read images (eg PNG, JPG, etc). When reading an image file the contents are presented visually as Claude Code is a multimodal LLM.\n- This tool can read PDF files (.pdf). PDFs are processed page by page, extracting both text and visual content for analysis.\n- This tool can read Jupyter notebooks (.ipynb files) and returns all cells with their outputs, combining code, text, and visualizations.\n- You have the capability to call multiple tools in a single response. It is always better to speculatively read multiple files as a batch that are potentially useful. \n- You will regularly be asked to read screenshots. If the user provides a path to a screenshot ALWAYS use this tool to view the file at the path. This tool will work with all temporary file paths like /var/folders/123/abc/T/TemporaryItems/NSIRD_screencaptureui_ZfB1tD/Screenshot.png\n- If you read a file that exists but has empty contents you will receive a system reminder warning in place of file contents.",
"input_schema": {
"type": "object",
"properties": {
"file_path": {
"type": "string",
"description": "The absolute path to the file to read"
},
"offset": {
"type": "number",
"description": "The line number to start reading from. Only provide if the file is too large to read at once"
},
"limit": {
"type": "number",
"description": "The number of lines to read. Only provide if the file is too large to read at once."
}
},
"required": [
"file_path"
],
"additionalProperties": false,
"$schema": "http://json-schema.org/draft-07/schema#"
}
},
{
"name": "Edit",
"description": "Performs exact string replacements in files. \n\nUsage:\n- You must use your `Read` tool at least once in the conversation before editing. This tool will error if you attempt an edit without reading the file. \n- When editing text from Read tool output, ensure you preserve the exact indentation (tabs/spaces) as it appears AFTER the line number prefix. The line number prefix format is: spaces + line number + tab. Everything after that tab is the actual file content to match. Never include any part of the line number prefix in the old_string or new_string.\n- ALWAYS prefer editing existing files in the codebase. NEVER write new files unless explicitly required.\n- Only use emojis if the user explicitly requests it. Avoid adding emojis to files unless asked.\n- The edit will FAIL if `old_string` is not unique in the file. Either provide a larger string with more surrounding context to make it unique or use `replace_all` to change every instance of `old_string`. \n- Use `replace_all` for replacing and renaming strings across the file. This parameter is useful if you want to rename a variable for instance.",
"input_schema": {
"type": "object",
"properties": {
"file_path": {
"type": "string",
"description": "The absolute path to the file to modify"
},
"old_string": {
"type": "string",
"description": "The text to replace"
},
"new_string": {
"type": "string",
"description": "The text to replace it with (must be different from old_string)"
},
"replace_all": {
"type": "boolean",
"default": false,
"description": "Replace all occurences of old_string (default false)"
}
},
"required": [
"file_path",
"old_string",
"new_string"
],
"additionalProperties": false,
"$schema": "http://json-schema.org/draft-07/schema#"
}
},
{
"name": "MultiEdit",
"description": "This is a tool for making multiple edits to a single file in one operation. It is built on top of the Edit tool and allows you to perform multiple find-and-replace operations efficiently. Prefer this tool over the Edit tool when you need to make multiple edits to the same file.\n\nBefore using this tool:\n\n1. Use the Read tool to understand the file's contents and context\n2. Verify the directory path is correct\n\nTo make multiple file edits, provide the following:\n1. file_path: The absolute path to the file to modify (must be absolute, not relative)\n2. edits: An array of edit operations to perform, where each edit contains:\n - old_string: The text to replace (must match the file contents exactly, including all whitespace and indentation)\n - new_string: The edited text to replace the old_string\n - replace_all: Replace all occurences of old_string. This parameter is optional and defaults to false.\n\nIMPORTANT:\n- All edits are applied in sequence, in the order they are provided\n- Each edit operates on the result of the previous edit\n- All edits must be valid for the operation to succeed - if any edit fails, none will be applied\n- This tool is ideal when you need to make several changes to different parts of the same file\n- For Jupyter notebooks (.ipynb files), use the NotebookEdit instead\n\nCRITICAL REQUIREMENTS:\n1. All edits follow the same requirements as the single Edit tool\n2. The edits are atomic - either all succeed or none are applied\n3. Plan your edits carefully to avoid conflicts between sequential operations\n\nWARNING:\n- The tool will fail if edits.old_string doesn't match the file contents exactly (including whitespace)\n- The tool will fail if edits.old_string and edits.new_string are the same\n- Since edits are applied in sequence, ensure that earlier edits don't affect the text that later edits are trying to find\n\nWhen making edits:\n- Ensure all edits result in idiomatic, correct code\n- Do not leave the code in a broken state\n- Always use absolute file paths (starting with /)\n- Only use emojis if the user explicitly requests it. Avoid adding emojis to files unless asked.\n- Use replace_all for replacing and renaming strings across the file. This parameter is useful if you want to rename a variable for instance.\n\nIf you want to create a new file, use:\n- A new file path, including dir name if needed\n- First edit: empty old_string and the new file's contents as new_string\n- Subsequent edits: normal edit operations on the created content",
"input_schema": {
"type": "object",
"properties": {
"file_path": {
"type": "string",
"description": "The absolute path to the file to modify"
},
"edits": {
"type": "array",
"items": {
"type": "object",
"properties": {
"old_string": {
"type": "string",
"description": "The text to replace"
},
"new_string": {
"type": "string",
"description": "The text to replace it with"
},
"replace_all": {
"type": "boolean",
"default": false,
"description": "Replace all occurences of old_string (default false)."
}
},
"required": [
"old_string",
"new_string"
],
"additionalProperties": false
},
"minItems": 1,
"description": "Array of edit operations to perform sequentially on the file"
}
},
"required": [
"file_path",
"edits"
],
"additionalProperties": false,
"$schema": "http://json-schema.org/draft-07/schema#"
}
},
{
"name": "Write",
"description": "Writes a file to the local filesystem.\n\nUsage:\n- This tool will overwrite the existing file if there is one at the provided path.\n- If this is an existing file, you MUST use the Read tool first to read the file's contents. This tool will fail if you did not read the file first.\n- ALWAYS prefer editing existing files in the codebase. NEVER write new files unless explicitly required.\n- NEVER proactively create documentation files (*.md) or README files. Only create documentation files if explicitly requested by the User.\n- Only use emojis if the user explicitly requests it. Avoid writing emojis to files unless asked.",
"input_schema": {
"type": "object",
"properties": {
"file_path": {
"type": "string",
"description": "The absolute path to the file to write (must be absolute, not relative)"
},
"content": {
"type": "string",
"description": "The content to write to the file"
}
},
"required": [
"file_path",
"content"
],
"additionalProperties": false,
"$schema": "http://json-schema.org/draft-07/schema#"
}
},
{
"name": "NotebookEdit",
"description": "Completely replaces the contents of a specific cell in a Jupyter notebook (.ipynb file) with new source. Jupyter notebooks are interactive documents that combine code, text, and visualizations, commonly used for data analysis and scientific computing. The notebook_path parameter must be an absolute path, not a relative path. The cell_number is 0-indexed. Use edit_mode=insert to add a new cell at the index specified by cell_number. Use edit_mode=delete to delete the cell at the index specified by cell_number.",
"input_schema": {
"type": "object",
"properties": {
"notebook_path": {
"type": "string",
"description": "The absolute path to the Jupyter notebook file to edit (must be absolute, not relative)"
},
"cell_id": {
"type": "string",
"description": "The ID of the cell to edit. When inserting a new cell, the new cell will be inserted after the cell with this ID, or at the beginning if not specified."
},
"new_source": {
"type": "string",
"description": "The new source for the cell"
},
"cell_type": {
"type": "string",
"enum": [
"code",
"markdown"
],
"description": "The type of the cell (code or markdown). If not specified, it defaults to the current cell type. If using edit_mode=insert, this is required."
},
"edit_mode": {
"type": "string",
"enum": [
"replace",
"insert",
"delete"
],
"description": "The type of edit to make (replace, insert, delete). Defaults to replace."
}
},
"required": [
"notebook_path",
"new_source"
],
"additionalProperties": false,
"$schema": "http://json-schema.org/draft-07/schema#"
}
},
{
"name": "WebFetch",
"description": "\n- Fetches content from a specified URL and processes it using an AI model\n- Takes a URL and a prompt as input\n- Fetches the URL content, converts HTML to markdown\n- Processes the content with the prompt using a small, fast model\n- Returns the model's response about the content\n- Use this tool when you need to retrieve and analyze web content\n\nUsage notes:\n - IMPORTANT: If an MCP-provided web fetch tool is available, prefer using that tool instead of this one, as it may have fewer restrictions. All MCP-provided tools start with \"mcp__\".\n - The URL must be a fully-formed valid URL\n - HTTP URLs will be automatically upgraded to HTTPS\n - The prompt should describe what information you want to extract from the page\n - This tool is read-only and does not modify any files\n - Results may be summarized if the content is very large\n - Includes a self-cleaning 15-minute cache for faster responses when repeatedly accessing the same URL\n - When a URL redirects to a different host, the tool will inform you and provide the redirect URL in a special format. You should then make a new WebFetch request with the redirect URL to fetch the content.\n",
"input_schema": {
"type": "object",
"properties": {
"url": {
"type": "string",
"format": "uri",
"description": "The URL to fetch content from"
},
"prompt": {
"type": "string",
"description": "The prompt to run on the fetched content"
}
},
"required": [
"url",
"prompt"
],
"additionalProperties": false,
"$schema": "http://json-schema.org/draft-07/schema#"
}
},
{
"name": "TodoWrite",
"description": "Use this tool to create and manage a structured task list for your current coding session. This helps you track progress, organize complex tasks, and demonstrate thoroughness to the user.\nIt also helps the user understand the progress of the task and overall progress of their requests.\n\n## When to Use This Tool\nUse this tool proactively in these scenarios:\n\n1. Complex multi-step tasks - When a task requires 3 or more distinct steps or actions\n2. Non-trivial and complex tasks - Tasks that require careful planning or multiple operations\n3. User explicitly requests todo list - When the user directly asks you to use the todo list\n4. User provides multiple tasks - When users provide a list of things to be done (numbered or comma-separated)\n5. After receiving new instructions - Immediately capture user requirements as todos\n6. When you start working on a task - Mark it as in_progress BEFORE beginning work. Ideally you should only have one todo as in_progress at a time\n7. After completing a task - Mark it as completed and add any new follow-up tasks discovered during implementation\n\n## When NOT to Use This Tool\n\nSkip using this tool when:\n1. There is only a single, straightforward task\n2. The task is trivial and tracking it provides no organizational benefit\n3. The task can be completed in less than 3 trivial steps\n4. The task is purely conversational or informational\n\nNOTE that you should not use this tool if there is only one trivial task to do. In this case you are better off just doing the task directly.\n\n## Examples of When to Use the Todo List\n\n<example>\nUser: I want to add a dark mode toggle to the application settings. Make sure you run the tests and build when you're done!\nAssistant: I'll help add a dark mode toggle to your application settings. Let me create a todo list to track this implementation.\n*Creates todo list with the following items:*\n1. Create dark mode toggle component in Settings page\n2. Add dark mode state management (context/store)\n3. Implement CSS-in-JS styles for dark theme\n4. Update existing components to support theme switching\n5. Run tests and build process, addressing any failures or errors that occur\n*Begins working on the first task*\n\n<reasoning>\nThe assistant used the todo list because:\n1. Adding dark mode is a multi-step feature requiring UI, state management, and styling changes\n2. The user explicitly requested tests and build be run afterward\n3. The assistant inferred that tests and build need to pass by adding \"Ensure tests and build succeed\" as the final task\n</reasoning>\n</example>\n\n<example>\nUser: Help me rename the function getCwd to getCurrentWorkingDirectory across my project\nAssistant: Let me first search through your codebase to find all occurrences of 'getCwd'.\n*Uses grep or search tools to locate all instances of getCwd in the codebase*\nAssistant: I've found 15 instances of 'getCwd' across 8 different files. Let me create a todo list to track these changes.\n*Creates todo list with specific items for each file that needs updating*\n\n<reasoning>\nThe assistant used the todo list because:\n1. First, the assistant searched to understand the scope of the task\n2. Upon finding multiple occurrences across different files, it determined this was a complex task with multiple steps\n3. The todo list helps ensure every instance is tracked and updated systematically\n4. This approach prevents missing any occurrences and maintains code consistency\n</reasoning>\n</example>\n\n\n<example>\nUser: I need to implement these features for my e-commerce site: user registration, product catalog, shopping cart, and checkout flow.\nAssistant: I'll help implement these features. First, let's add all the features to the todo list.\n*Creates a todo list breaking down each feature into specific tasks based on the project architecture*\nAssistant: Let's start with user registration. This will involve creating database models, API endpoints, and frontend forms that integrate with your existing authentication system.\n\n<reasoning>\nThe assistant used the todo list because:\n1. The user provided multiple complex features to implement in a comma separated list\n2. The todo list helps organize these large features into manageable tasks\n3. This approach allows for tracking progress across the entire implementation\n</reasoning>\n</example>\n\n<example>\nUser: Can you help optimize my React application? It's rendering slowly and has performance issues.</user>\nAssistant: I'll help optimize your React application. First, let me examine your codebase to identify potential performance bottlenecks.\n*Reviews component structure, render patterns, state management, and data fetching*\nAssistant: After analyzing your codebase, I've identified several performance issues. Let me create a todo list to track our optimization efforts.\n*Creates todo list with items like: 1) Implement memoization for expensive calculations in ProductList, 2) Add virtualization for long lists in Dashboard, 3) Optimize image loading in Gallery component, 4) Fix state update loops in ShoppingCart, 5) Review bundle size and implement code splitting*\nLet's start by implementing memoization for the expensive calculations in your ProductList component.</assistant>\n\n<reasoning>\nThe assistant used the todo list because:\n1. First, the assistant examined the codebase to identify specific performance issues\n2. Based on this analysis, it identified multiple optimization opportunities\n3. Performance optimization is a non-trivial task requiring multiple steps\n4. The todo list helps methodically track improvements across different components\n5. This systematic approach ensures all performance bottlenecks are addressed\n</reasoning>\n</example>\n\n## Examples of When NOT to Use the Todo List\n\n<example>\nUser: How do I print 'Hello World' in Python?\nAssistant: In Python, you can print \"Hello World\" with this simple code:\n\npython\nprint(\"Hello World\")\n\nThis will output the text \"Hello World\" to the console when executed.</assistant>\n\n<reasoning>\nThe assistant did not use the todo list because this is a single, trivial task that can be completed in one step. There's no need to track multiple tasks or steps for such a straightforward request.\n</reasoning>\n</example>\n\n<example>\nUser: What does the git status command do?\nAssistant: The git status command shows the current state of your working directory and staging area. It displays which changes have been staged, which haven't, and which files aren't being tracked by Git. This is a fundamental command for understanding the current state of your repository before making commits.\n\n<reasoning>\nThe assistant did not use the todo list because this is an informational request with no actual coding task to complete. The user is simply asking for an explanation, not for the assistant to perform multiple steps or tasks.\n</reasoning>\n</example>\n\n<example>\nUser: Can you add a comment to the calculateTotal function to explain what it does?\nAssistant: Sure, let me add a comment to the calculateTotal function to explain what it does.\n* Uses the Edit tool to add a comment to the calculateTotal function *\n\n<reasoning>\nThe assistant did not use the todo list because this is a single, straightforward task confined to one location in the code. Adding a comment doesn't require tracking multiple steps or systematic organization.\n</reasoning>\n</example>\n\n<example>\nUser: Run npm install for me and tell me what happens.\nAssistant: I'll run the npm install command for you.\n\n*Executes: npm install*\n\nThe command completed successfully. Here's the output:\n[Output of npm install command]\n\nAll dependencies have been installed according to your package.json file.\n\n<reasoning>\nThe assistant did not use the todo list because this is a single command execution with immediate results. There are no multiple steps to track or organize, making the todo list unnecessary for this straightforward task.\n</reasoning>\n</example>\n\n## Task States and Management\n\n1. **Task States**: Use these states to track progress:\n - pending: Task not yet started\n - in_progress: Currently working on (limit to ONE task at a time)\n - completed: Task finished successfully\n\n2. **Task Management**:\n - Update task status in real-time as you work\n - Mark tasks complete IMMEDIATELY after finishing (don't batch completions)\n - Only have ONE task in_progress at any time\n - Complete current tasks before starting new ones\n - Remove tasks that are no longer relevant from the list entirely\n\n3. **Task Completion Requirements**:\n - ONLY mark a task as completed when you have FULLY accomplished it\n - If you encounter errors, blockers, or cannot finish, keep the task as in_progress\n - When blocked, create a new task describing what needs to be resolved\n - Never mark a task as completed if:\n - Tests are failing\n - Implementation is partial\n - You encountered unresolved errors\n - You couldn't find necessary files or dependencies\n\n4. **Task Breakdown**:\n - Create specific, actionable items\n - Break complex tasks into smaller, manageable steps\n - Use clear, descriptive task names\n\nWhen in doubt, use this tool. Being proactive with task management demonstrates attentiveness and ensures you complete all requirements successfully.\n",
"input_schema": {
"type": "object",
"properties": {
"todos": {
"type": "array",
"items": {
"type": "object",
"properties": {
"content": {
"type": "string",
"minLength": 1
},
"status": {
"type": "string",
"enum": [
"pending",
"in_progress",
"completed"
]
},
"id": {
"type": "string"
}
},
"required": [
"content",
"status",
"id"
],
"additionalProperties": false
},
"description": "The updated todo list"
}
},
"required": [
"todos"
],
"additionalProperties": false,
"$schema": "http://json-schema.org/draft-07/schema#"
}
},
{
"name": "WebSearch",
"description": "\n- Allows Claude to search the web and use the results to inform responses\n- Provides up-to-date information for current events and recent data\n- Returns search result information formatted as search result blocks\n- Use this tool for accessing information beyond Claude's knowledge cutoff\n- Searches are performed automatically within a single API call\n\nUsage notes:\n - Domain filtering is supported to include or block specific websites\n - Web search is only available in the US\n - Account for \"Today's date\" in <env>. For example, if <env> says \"Today's date: 2025-07-01\", and the user wants the latest docs, do not use 2024 in the search query. Use 2025.\n",
"input_schema": {
"type": "object",
"properties": {
"query": {
"type": "string",
"minLength": 2,
"description": "The search query to use"
},
"allowed_domains": {
"type": "array",
"items": {
"type": "string"
},
"description": "Only include search results from these domains"
},
"blocked_domains": {
"type": "array",
"items": {
"type": "string"
},
"description": "Never include search results from these domains"
}
},
"required": [
"query"
],
"additionalProperties": false,
"$schema": "http://json-schema.org/draft-07/schema#"
}
},
{
"name": "BashOutput",
"description": "\n- Retrieves output from a running or completed background bash shell\n- Takes a shell_id parameter identifying the shell\n- Always returns only new output since the last check\n- Returns stdout and stderr output along with shell status\n- Supports optional regex filtering to show only lines matching a pattern\n- Use this tool when you need to monitor or check the output of a long-running shell\n- Shell IDs can be found using the /bashes command\n",
"input_schema": {
"type": "object",
"properties": {
"bash_id": {
"type": "string",
"description": "The ID of the background shell to retrieve output from"
},
"filter": {
"type": "string",
"description": "Optional regular expression to filter the output lines. Only lines matching this regex will be included in the result. Any lines that do not match will no longer be available to read."
}
},
"required": [
"bash_id"
],
"additionalProperties": false,
"$schema": "http://json-schema.org/draft-07/schema#"
}
},
{
"name": "KillBash",
"description": "\n- Kills a running background bash shell by its ID\n- Takes a shell_id parameter identifying the shell to kill\n- Returns a success or failure status \n- Use this tool when you need to terminate a long-running shell\n- Shell IDs can be found using the /bashes command\n",
"input_schema": {
"type": "object",
"properties": {
"shell_id": {
"type": "string",
"description": "The ID of the background shell to kill"
}
},
"required": [
"shell_id"
],
"additionalProperties": false,
"$schema": "http://json-schema.org/draft-07/schema#"
}
}
]
}
Codex CLI
https://github.com/openai/codex,相关链接:https://blog.promptlayer.com/how-openai-codex-works-behind-the-scenes-and-how-it-compares-to-claude-code/
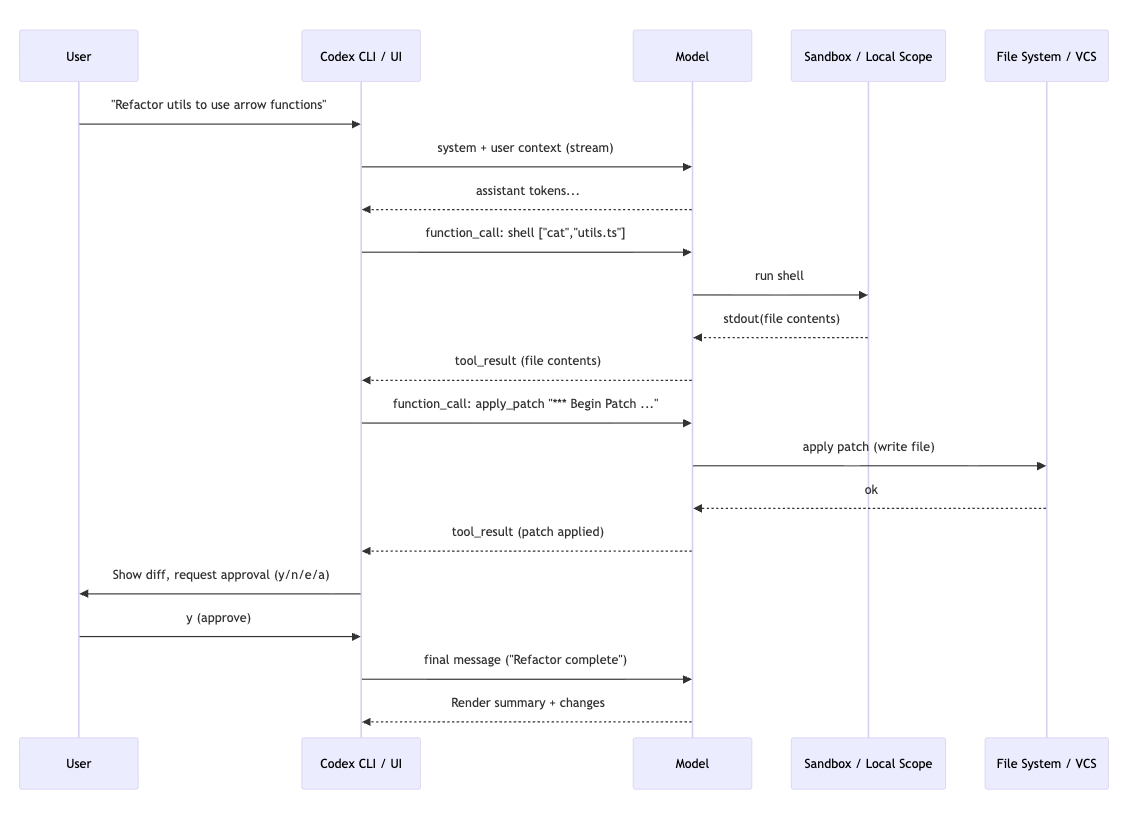
主代理循环(Codex CLI内部原理)
在核心层面,Codex CLI运行在一个单代理(single-agent)、ReAct风格的循环上,由 AgentLoop.run() 函数实现。其设计模式为:思考 → 调用工具 → 观察 → 重复,直到模型产生一个最终答案而不再需要额外工具调用为止。
该循环利用了OpenAI的Responses API,并带有流式(streaming)功能,支持函数/工具调用和可选的“reasoning”项。典型交互流程如下:
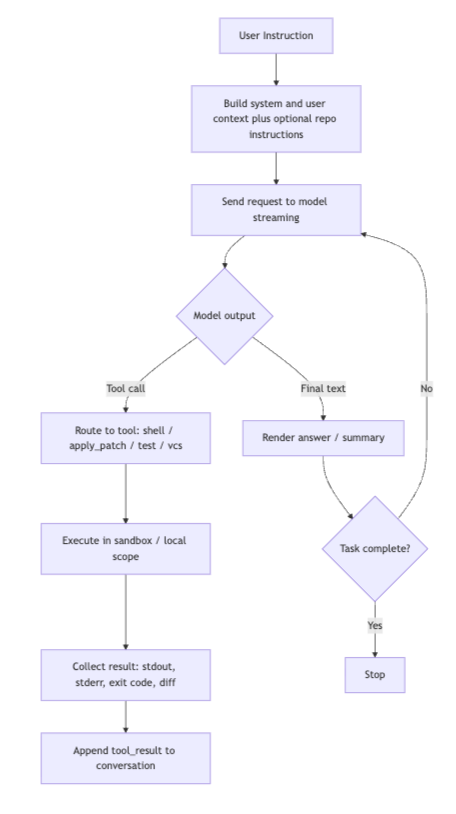
- 用户输入一个提示(例如:“把 utils.ts重构成箭头函数”)
- CLI构造一个带有详细系统前缀的对话上下文
- 将请求发送给OpenAI的GPT-5系列模型
- 模型流式输出响应,可能包含工具调用请求
- CLI执行所请求的工具,并将结果反馈回去
- 过程重复,直到完成
根据Codex的system prompt明确地在提示中编码了它的运行模式:一个单agent的ReAct循环,带有严格的工具契约和“持续工作直到完成”的偏向。提示教会了它一个以shell为主的工具集(通过cat读取、通过grep/find搜索、运行测试/代码检查/git),并且将文件修改严格限制在apply_patch包裹内,推动模型进行最小化、外科手术式的差异修改,而不是整文件重写。
它还在提示中内置了安全与用户体验:默认沙箱/无网络假设、对风险命令设置清晰的审批门槛,以及在宣布成功前必须运行项目自带检查的指令。
规划在其中是隐含的——Codex 被引导为迭代(读取 → 编辑 → 测试),而不是一开始就生成一个大计划。同时,差异/审批路径让人类保持控制。
Codex倾向于一个由普通UNIX工具驱动的小型、可审计的补丁循环,并且在系统提示中直接编码了策略与护栏。
(Claude Code也采用了极其相似的单循环设计,避免了多代理并发的复杂性,同时保持了清晰的执行路径。)
工具设计
以Shell为中心,核心是一个统一的命令执行器。它依赖cat、grep、ls、git等经典CLI工具,并用apply_patch进行差异化编辑。理念是“用最少的工具组合完成最大覆盖”。
(Claude Code:提供结构化工具,例如 GrepTool、View、Edit/Replace、WebFetch、Notebook集成。每个操作有独立边界和权限验证,更像专门化的工具箱。)
文件与上下文处理
Codex:懒加载,只有当模型明确请求时才读取文件。这降低了token消耗,但容易缺少上下文,导致幻觉。它通过Git感知、AGENTS.md配置和实验性的全上下文模式来弥补。
文件编辑值得特别关注。Codex 不会输出整个文件内容,而是生成采用特定格式标记的统一差异。命令行界面会拦截apply_patch命令并在内部进行处理,显示带有颜色的差异(红色表示删除,绿色表示添加)供用户查看。用户可以批准、拒绝、编辑或全部批准。

Claude Code:主动扫描代码库,能够自动理解跨文件关系,减少遗漏和幻觉。在大型项目里,Claude 的理解范围更宽,重构建议也更有野心。
安全与权限模型
Codex:依赖操作系统级的沙箱(macOS的 Seatbelt、Linux的Docker+iptables)。有三种模式(只读、自动编辑、全自动),审批逻辑偏保守,保证安全边界。
Claude Code:更注重应用层权限控制,细粒度分类风险,UI上有“不要再问”选项,更贴近日常使用体验。整体更精致,但依赖Anthropic的云环境。
工作流与开发风格
Codex:坚持diff-first,强调最小修改,彩色化diff +用户审批,鼓励小步快跑。它更像一个精确的外科手术刀。

Claude Code:同样是diff-first,但因工具更强,能更轻松做多文件或大规模重构。同时,它会显示计划和思路,虽然透明,但有时显得啰嗦。

优势与适用场景
Codex的优势:轻量、可本地运行、开源、透明、安全性高、适合小步快速迭代和外科式修改。
Claude Code的优势:更智能的上下文扫描、更强的工具集、更完善的权限UX、擅长大型代码库和复杂重构。
社区反馈趋势
Codex更专注于执行具体请求,效率高,但在大项目里容易缺乏全局理解。
Claude Code更啰嗦,但对大型系统更可靠,幻觉更少。
社区排名不断变化,有时Codex被认为更快解决小问题,有时Claude更胜任复杂任务。
快速比较:各自优势
尽管它们有共同的基础——单循环、工具使用、以 diff为先的编辑、用户审批——但每个工具都有鲜明的强项。
Codex CLI优势
简化的工具表面,减少复杂性
强大的操作系统级沙箱,安全性高
Shell优先的模型,对开发者而言更熟悉
立即测试修改
明确的AI行为审计轨迹
易于通过 git 回滚
开源并可本地运行(Apache-2.0 许可证)
Claude Code优势
更广泛的工具集(搜索、网络、notebook)
显式规划与任务分解
主动的代码库扫描
更完善的权限UI,带有细粒度控制
在大型代码库中表现出色,幻觉更少
更擅长处理大型重构任务
那么,选哪个?
OpenAI Codex和Claude Code都代表了AI辅助开发的最前沿,各自针对不同工作流进行了优化。
Codex CLI体现了Unix哲学——简单工具的有效组合。它的shell优先方法、强大的沙箱和开源特性,使其非常适合那些重视控制和透明度的本地开发者。
Claude Code采取了更结构化的方法,具备专门构建的工具、显式规划以及强大的上下文处理。它擅长理解大型代码库和执行雄心勃勃的重构任务。
一句话总结:
Claude Code在大型代码库、减少幻觉、处理大型重构方面表现更佳
关键Prompt
Tools Prompts
1 | # Tools |
Author
My name is Micheal Wayne and this is my blog.
I am a front-end software engineer.
Contact: michealwayne@163.com